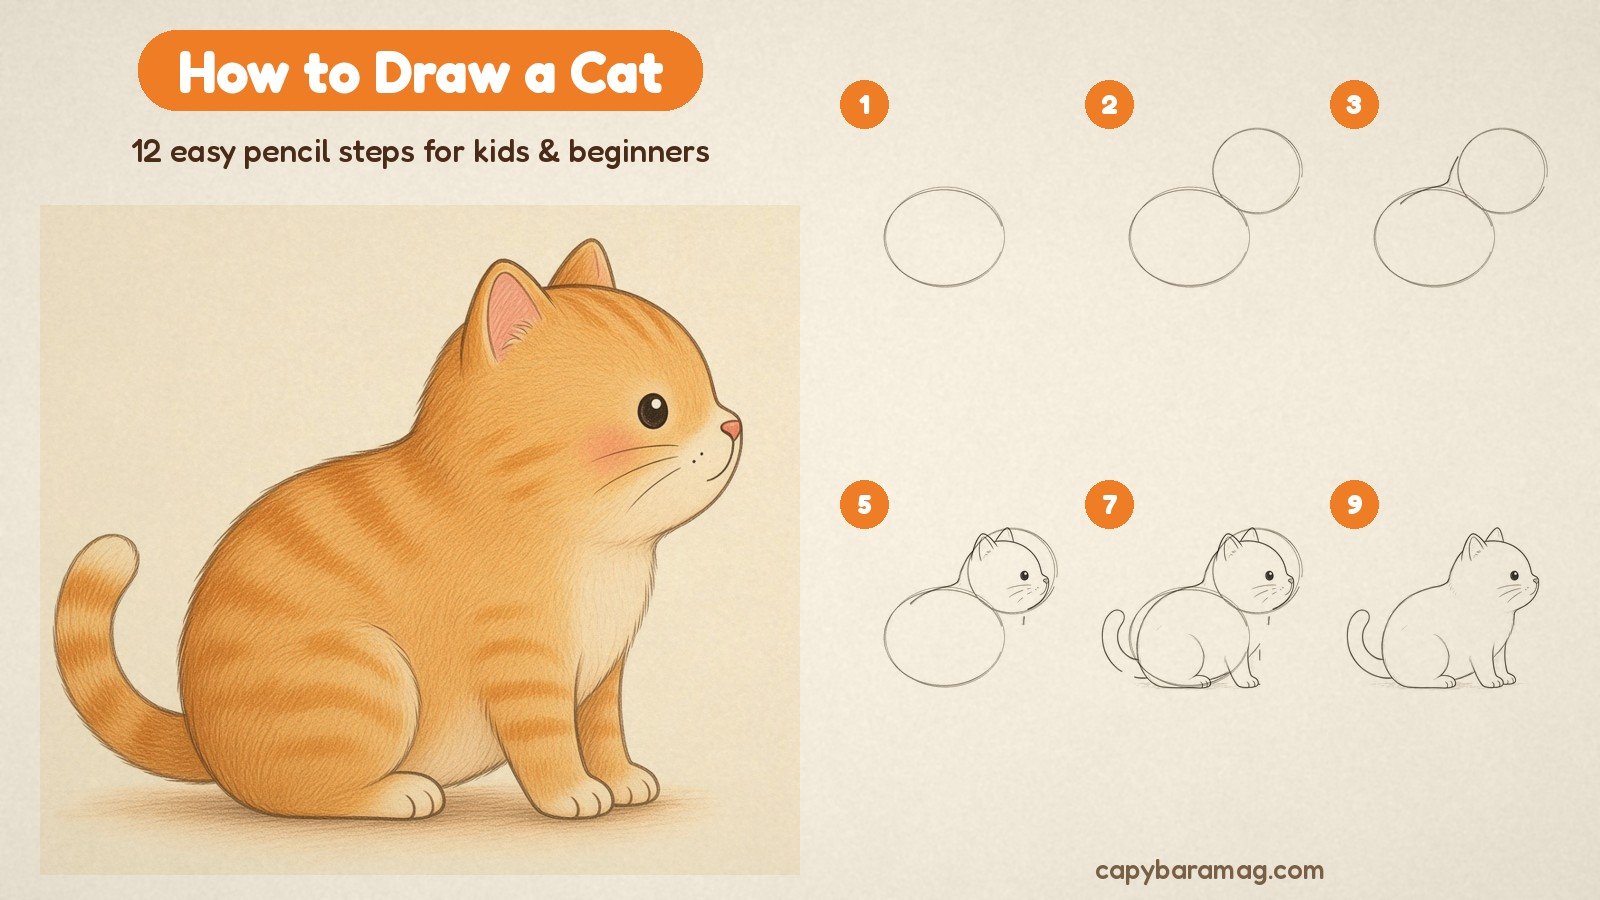
Want to learn how to draw a cat? You are in the right place. Cats are one of the easiest animals for beginners because their bodies are built from simple shapes: a big oval, a round head, pointed ears and a curling tail. In this beginner-friendly tutorial you will draw one cute sitting cat from two light guide shapes to a finished colored-pencil drawing in 12 easy steps. Each step adds just a few lines to the same drawing, so you always know exactly what to add next.
This guide works for kids, adults, art teachers and anyone who loves cats. Once you have the basic pose down, we will show you how to color it like a warm ginger tabby, how to turn it into a cute kawaii cat, and the common mistakes to avoid. If you would rather color than draw, grab our free kitten yarn basket coloring page or browse more printable coloring pages.
What You Need
- Paper – plain printer paper is fine; use smoother sketchbook paper if you plan to color with markers.
- A light pencil (HB or 2H) for guide shapes, and a softer pencil (2B) for the final outline.
- A good eraser – a kneaded eraser lifts guide lines without smudging.
- Coloring tools – colored pencils, markers or crayons in orange, cream, pink and a darker brown.
- Optional: a reference photo of a real cat, or study the fur colors in our animal wallpapers gallery for shading ideas.
Cat Anatomy Tips for Artists
A cat looks simple, but a few details make the difference between “a blob with ears” and an animal people instantly recognise as a cat:
- Big head, soft body: in the cute style the head is almost as large as the body, and the body is a soft loaf rather than a skinny stretch.
- Pointed triangle ears: cat ears sit high on the head; draw both, with the far ear peeping out behind.
- Large round eye: one big shiny eye in side view makes the cat look friendly and awake.
- Short muzzle: keep the nose small and close to the eye — a long snout turns it into a dog.
- Curling tail: the S- or U-shaped tail is a classic cat signal; don’t leave it out.
- Short legs: stubby paws keep the sitting pose low and cute.
How to Draw a Cat Step by Step
Tip: use a light pencil (HB or 2H) for steps 1–7, a softer 2B for step 8 onward, and colored pencils for steps 11 and 12. Follow the steps in order. Each picture is the same drawing as the one before it with a few new lines added.
Step 1: Draw a big oval for the body
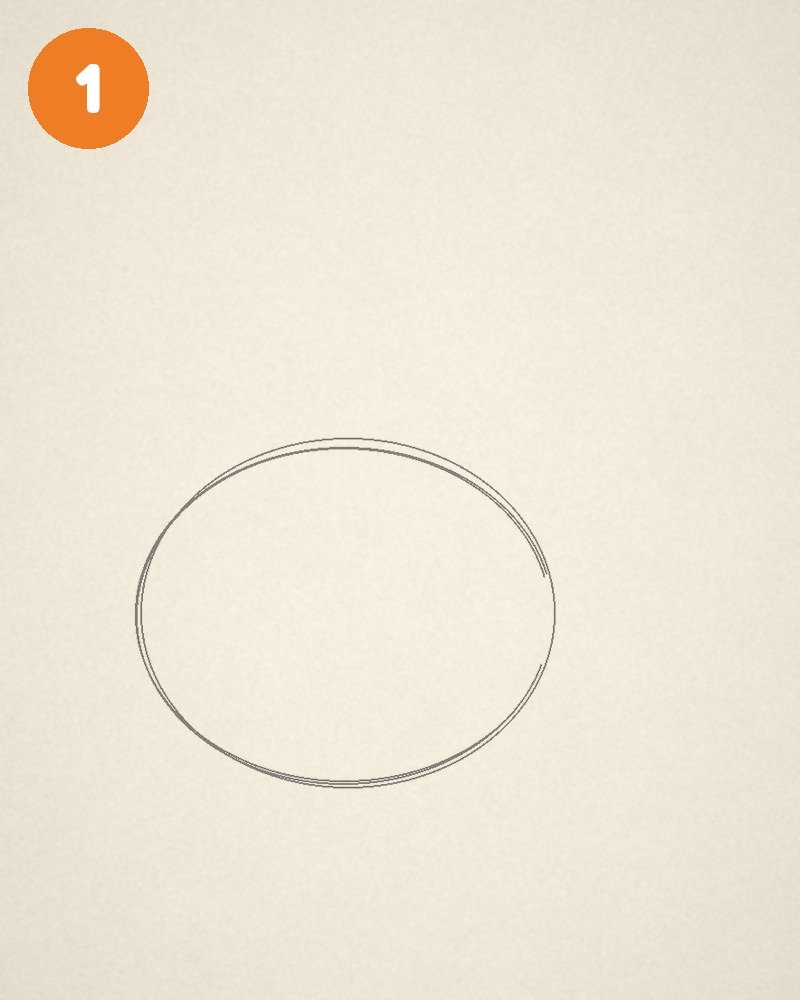
Start with a large, slightly tilted oval in the lower left of your page. This is the cat’s soft, loaf-shaped body, so make it wide and round. Press very lightly: this is only a guide, and you will erase or lighten it later.
Step 2: Add a circle for the head
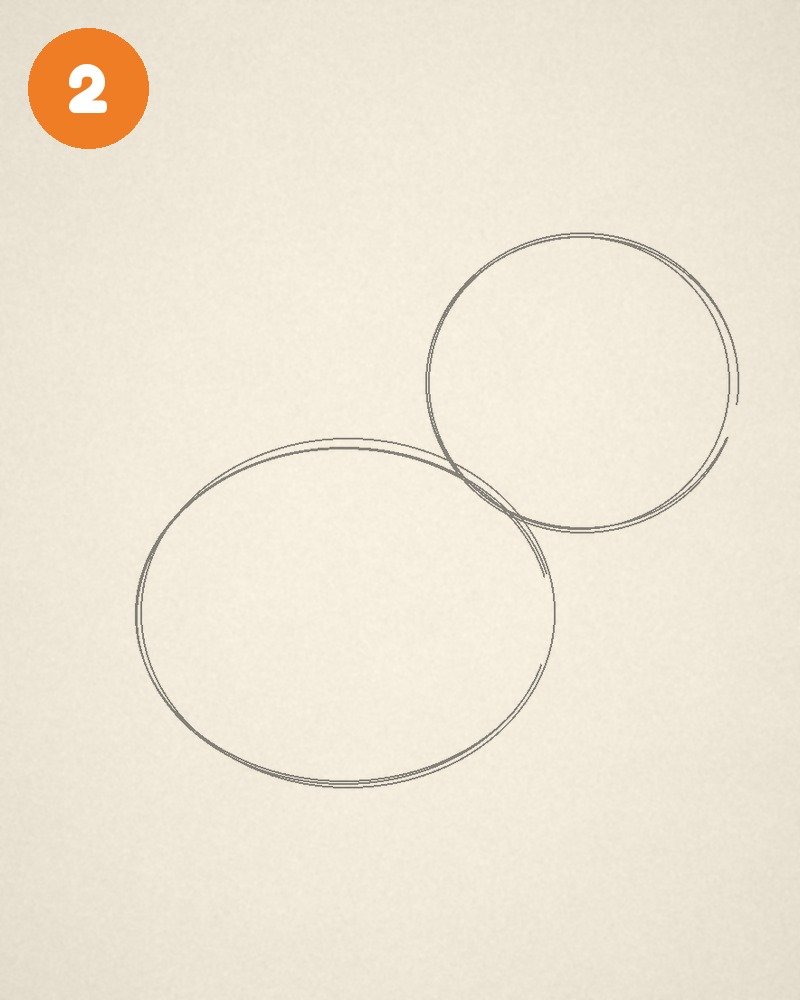
Draw a circle up and to the right of the body so that it overlaps the top-right edge of the oval. The cat faces right, so the head sits at the front. In this cute style the head is big — almost as wide as the body.
Step 3: Connect the neck and back
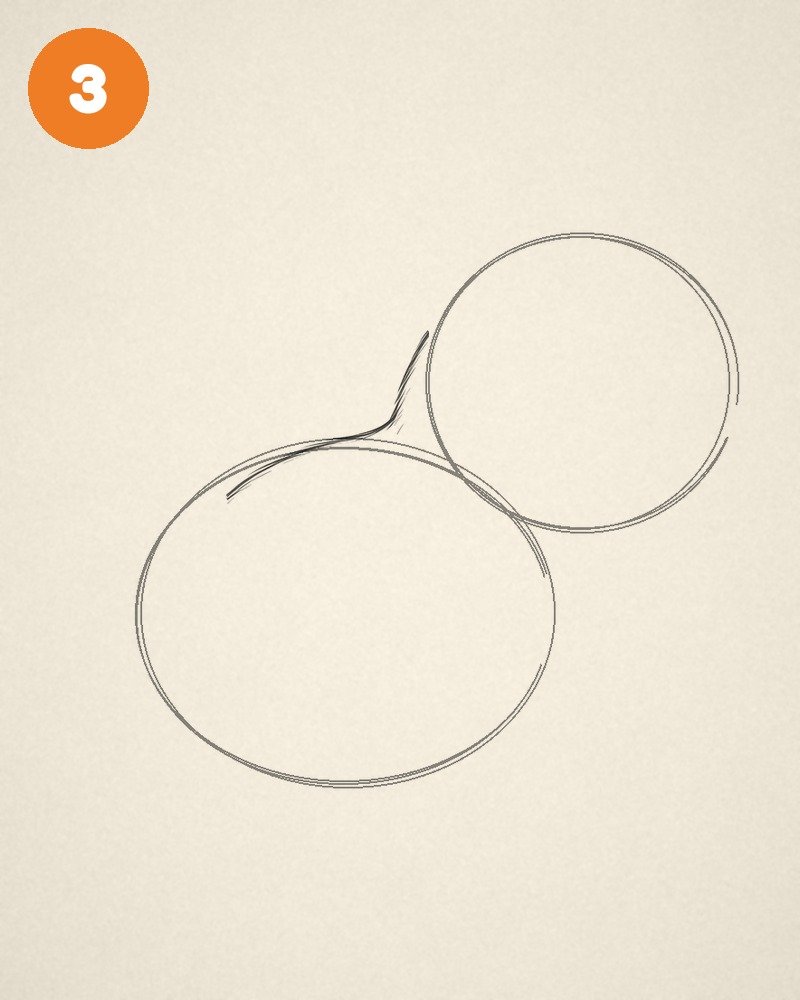
Now draw the first real outline. Start near the top of the head circle, curve down behind where the ears will go, then sweep a soft line over the top of the body oval for the back. Add a short curve under the chin for the front of the neck. These lines turn two shapes into one animal.
Step 4: Draw the snout and little nose
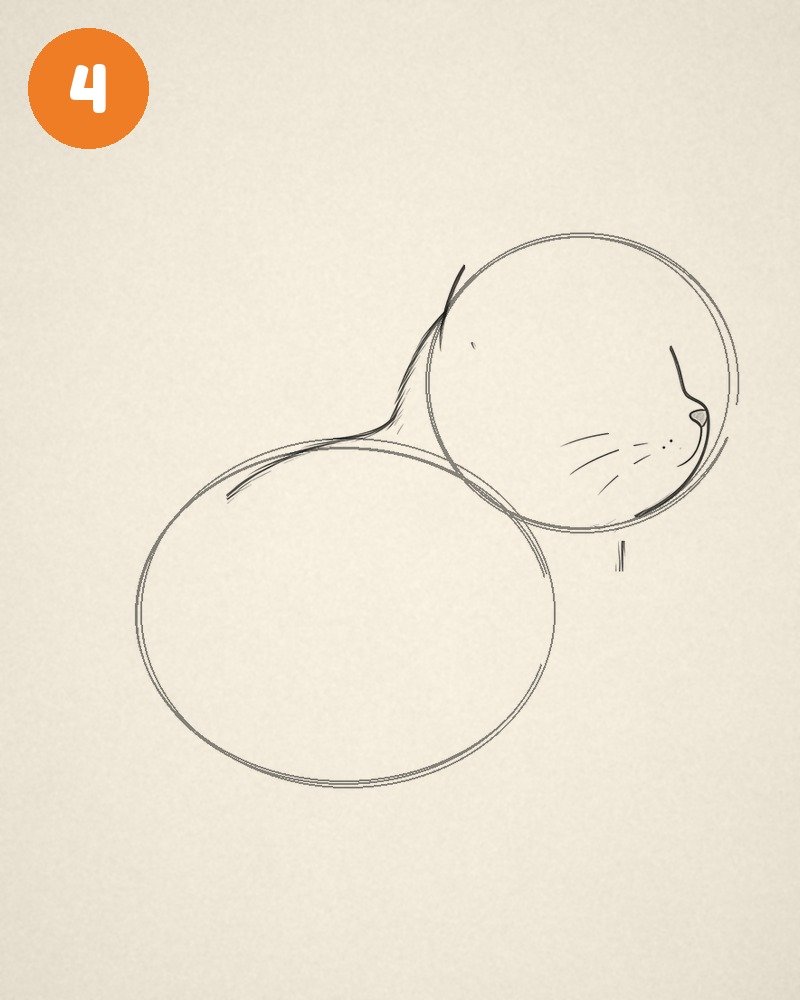
On the right side of the head circle, draw a small rounded muzzle that bulges out a little past the circle. Add a tiny triangular nose near the front and a soft smiling mouth underneath. Keep the muzzle short — cats have a small face compared with dogs.
Step 5: Add the ears and eye
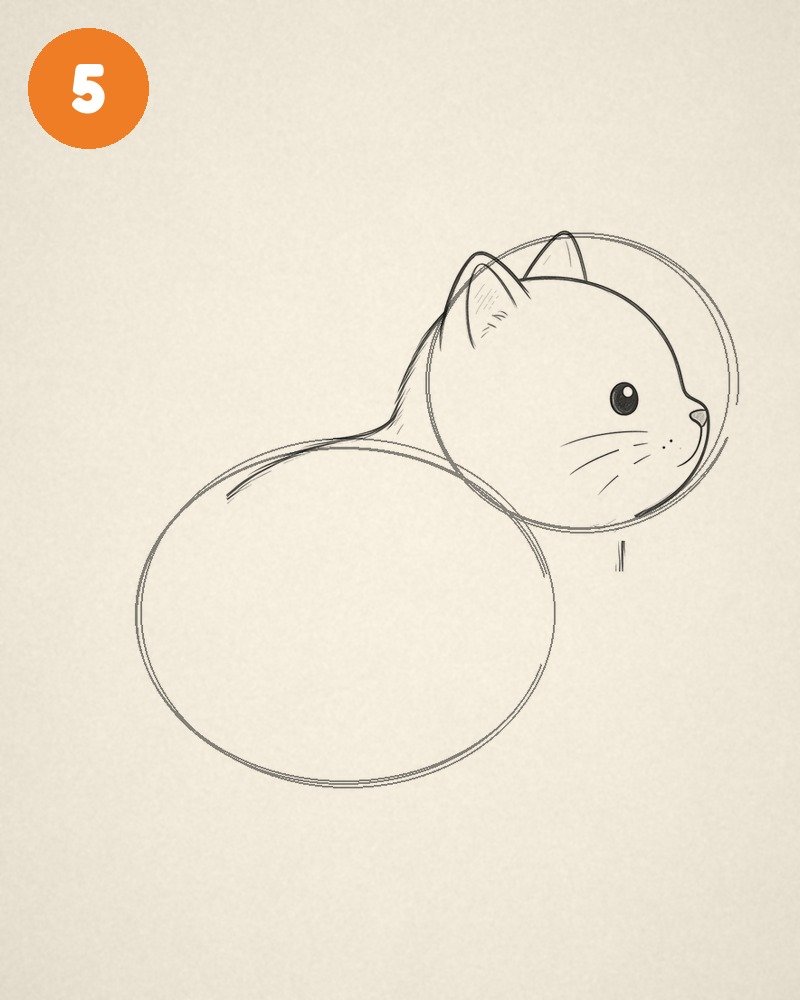
On top of the head, draw two pointed triangle ears (the far ear peeks out just behind the near one). Add a little inner-ear line. Then place a round black eye high on the head, with a tiny white sparkle. The large eye and pointed ears are what make it look like a cat.
Step 6: Draw the front paws
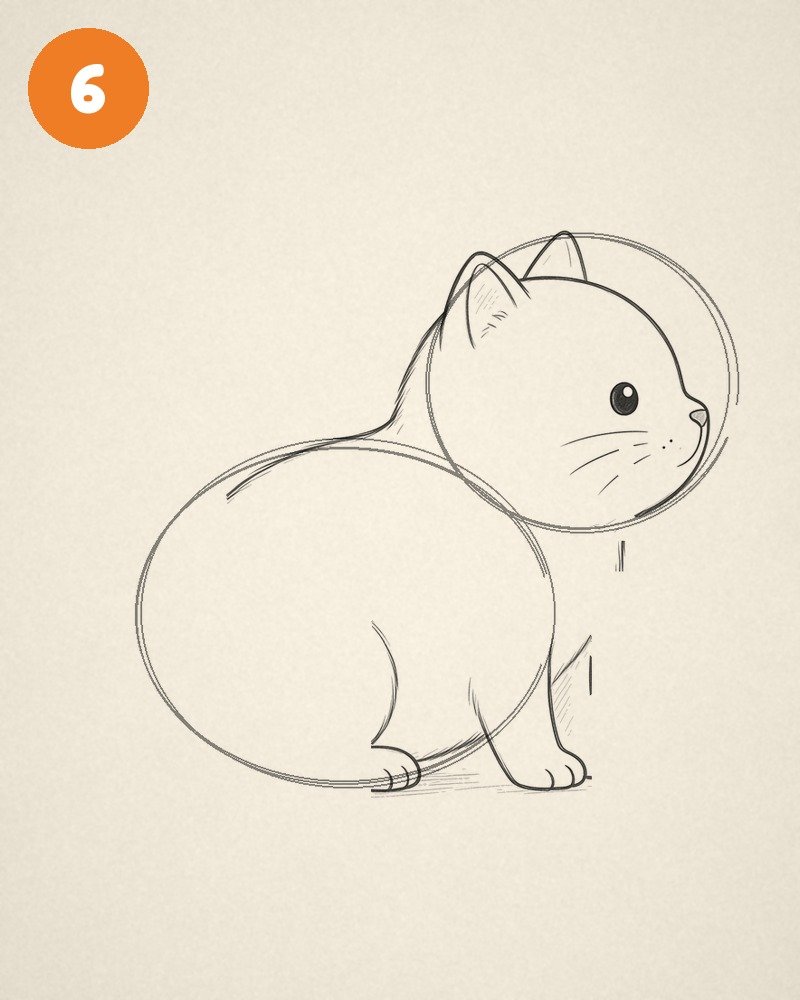
Under the chest, draw two short, stubby front legs side by side ending in round little paws with two or three toe marks. Keep them short so the cat stays low and cute.
Step 7: Draw the back leg and curling tail
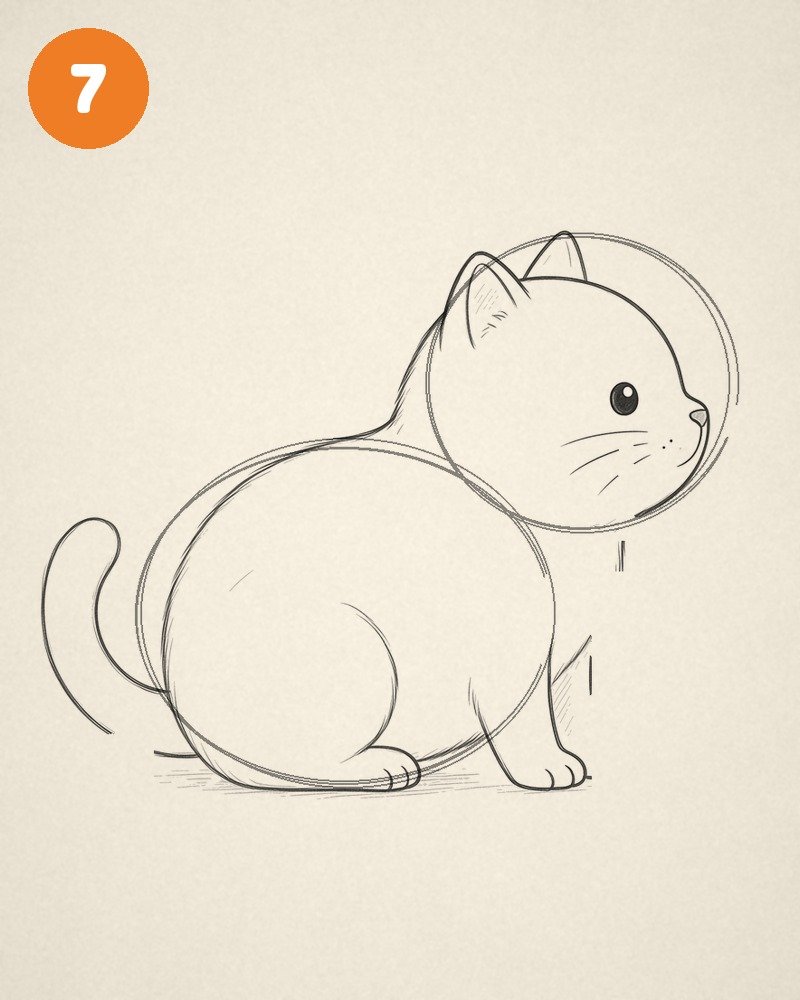
At the back of the body, draw a big rounded curve for the haunch inside the body oval, then a small back paw tucked underneath. From the rump, add a long curling tail that arcs up behind the cat — this is one of the cutest cat features.
Step 8: Refine the outline and lighten the guides
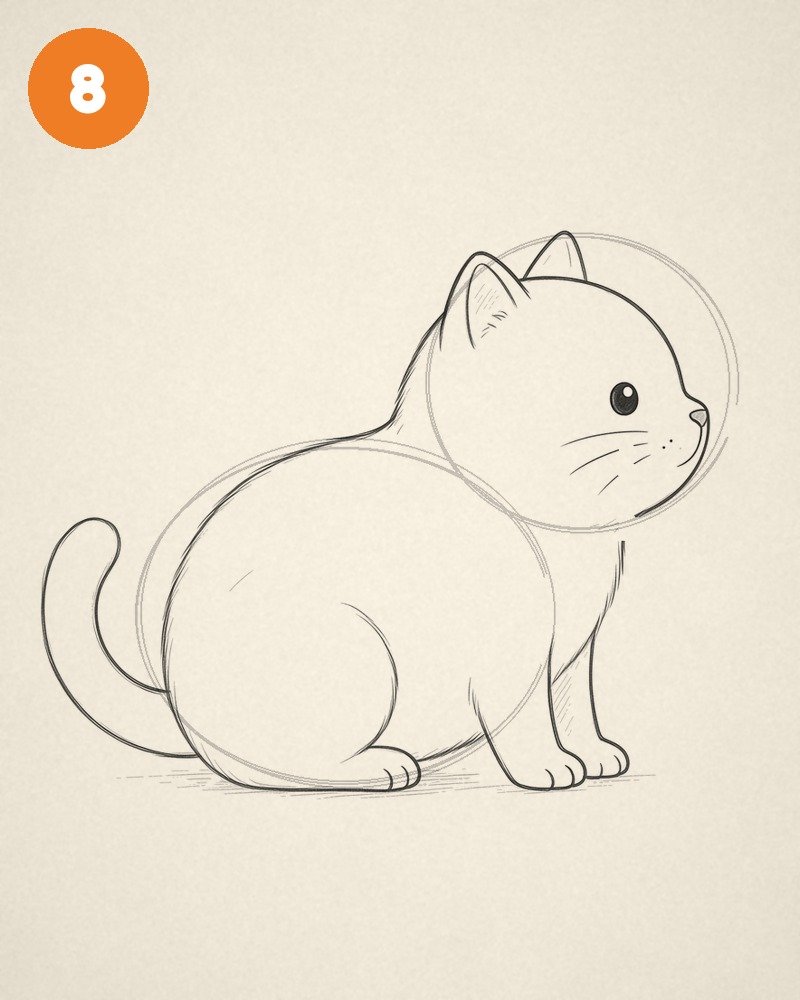
Go over your final outline with a slightly darker, confident line: the back, the round belly, the legs, the face and the tail. Then gently erase or lighten the oval and circle guides until they are barely visible. Your cat should now look clean and complete.
Step 9: Add fur strokes and whiskers
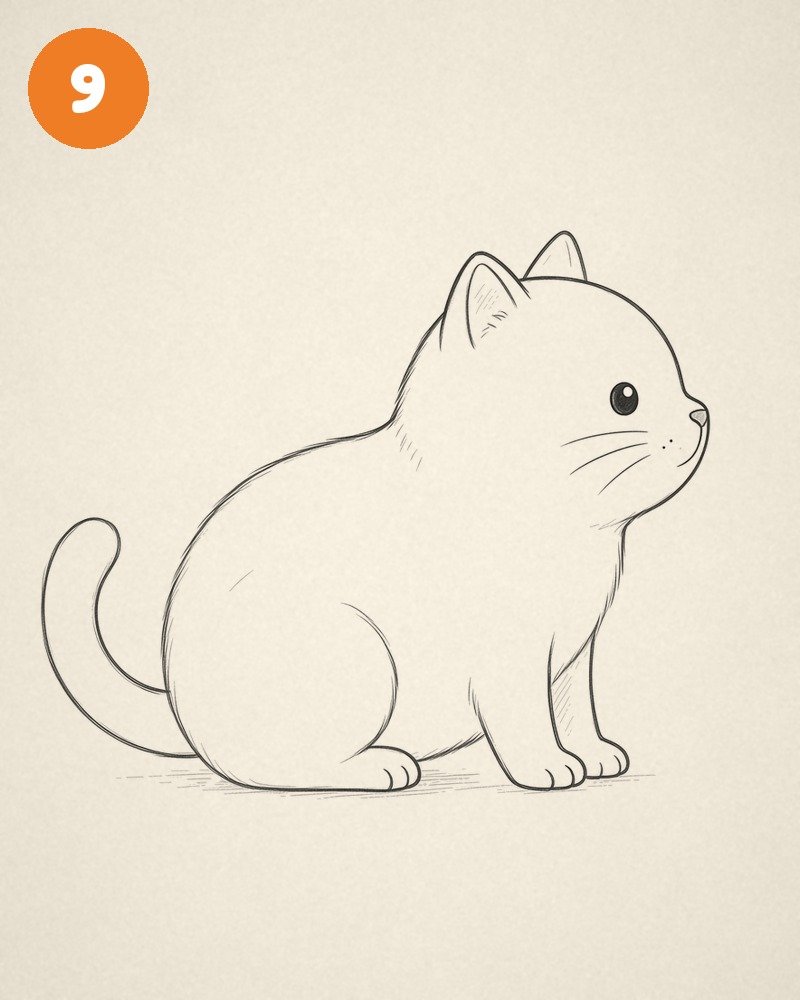
Erase the last of the guides. Add short pencil strokes along the back and chest for soft fur, a few lines inside the ear, three whiskers on the cheek, and a light ground shadow under the paws. Follow the direction the fur grows.
Step 10: Add light pencil shading
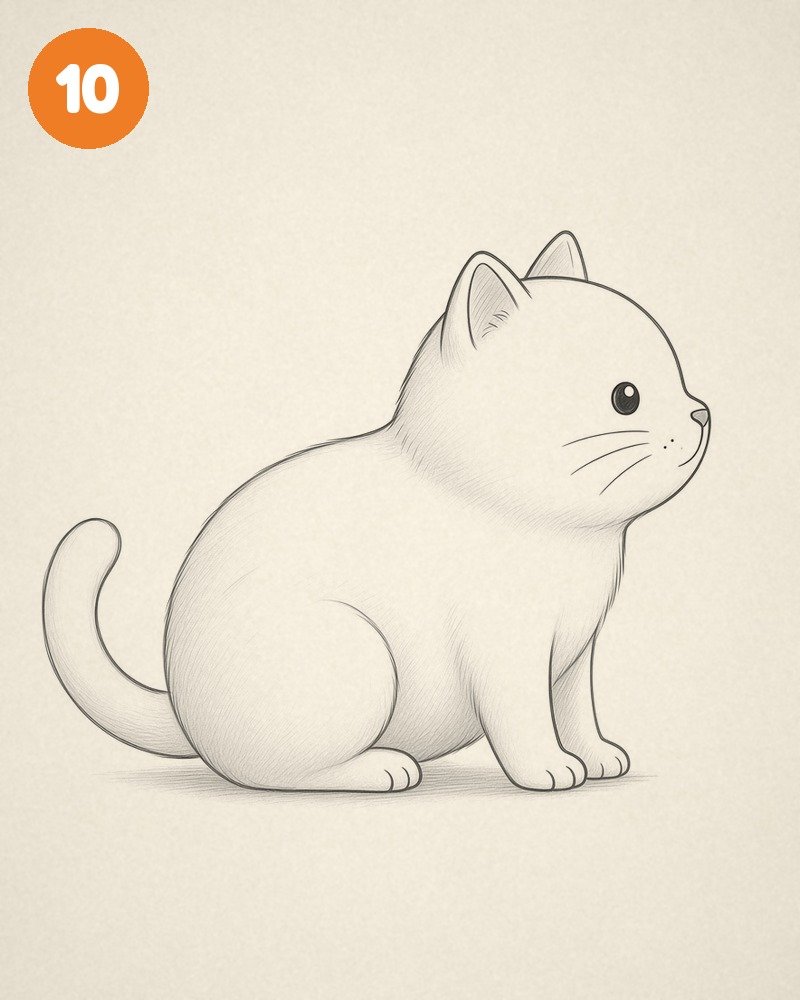
With the side of your pencil, add soft shading under the belly, behind the front legs, on the haunch and under the chin. Keep the top of the back and the face lighter. This makes the body look round and fluffy, ready for color.
Step 11: Lay a light colored-pencil base coat
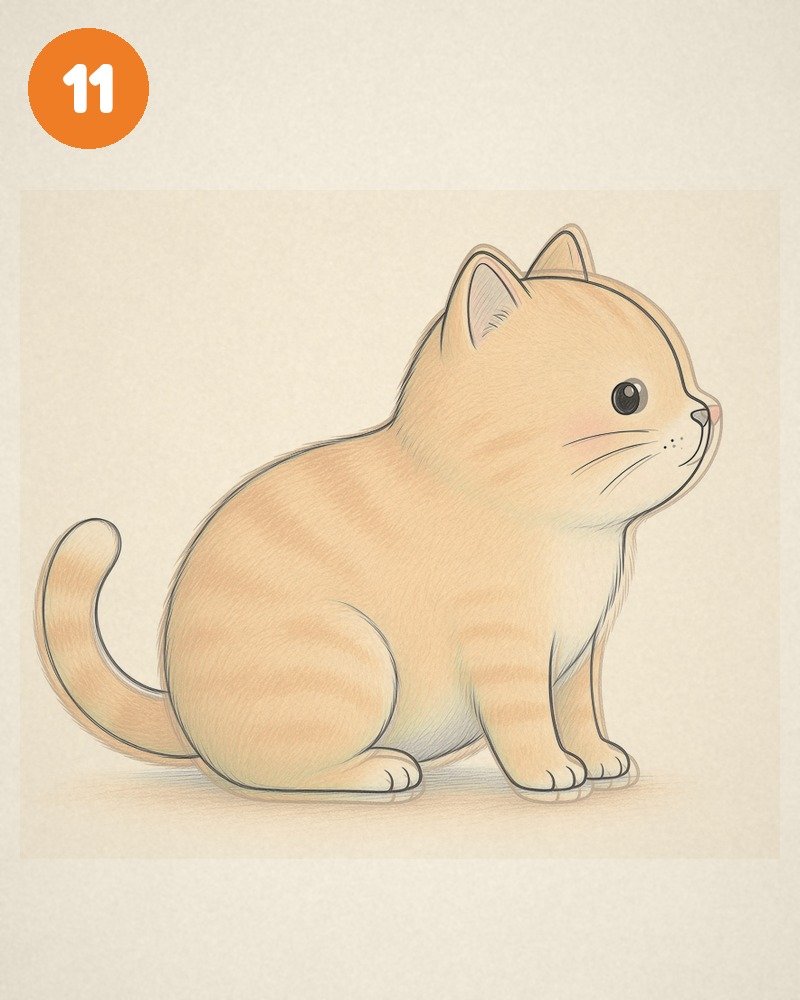
Pick a light peach or soft orange colored pencil and cover the whole body with an even, gentle layer. Leave the eye sparkle, the muzzle and the chest a little lighter. A light base coat makes it easy to build richer color without mud.
Step 12: Finish the color and deepen the stripes
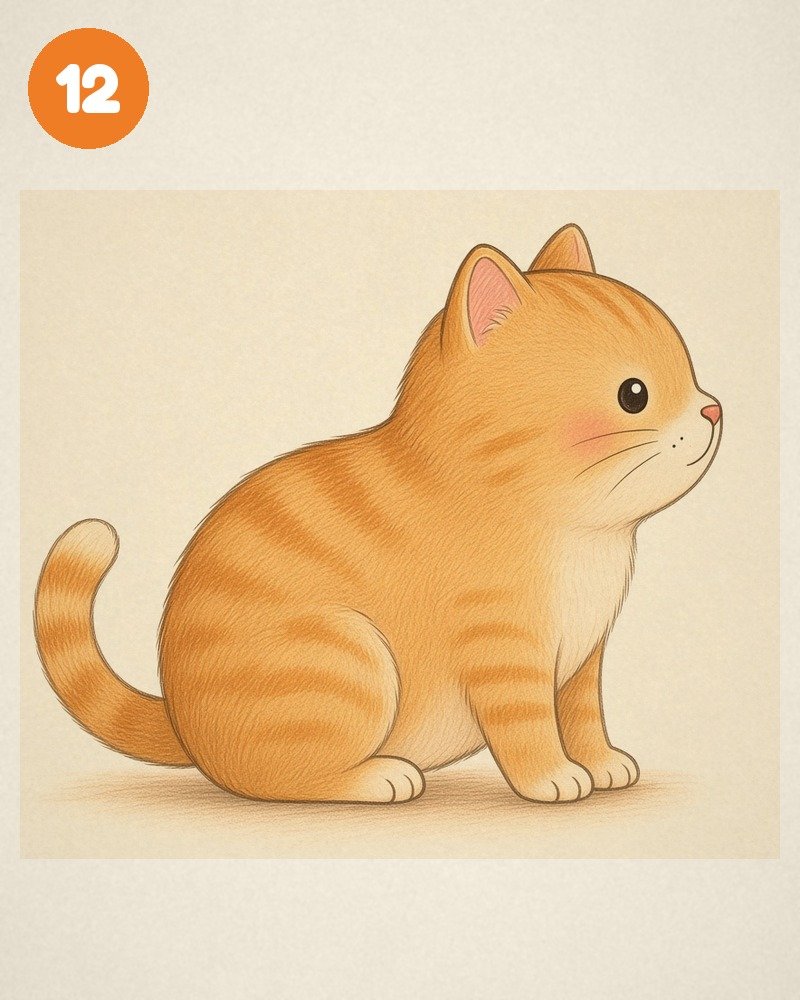
Add warmer orange on top, pressing a little harder on the back, haunch and legs. Draw soft tabby stripes on the forehead, back and tail. Color the nose and inner ears pink, deepen the eye, and add a soft ground shadow. Your cute cat is done!
That’s it – you have drawn a cat! Now try coloring it using the tips below.
Common Mistakes (and How to Fix Them)
- Long snout: a long muzzle makes it look like a dog or a fox. Keep the nose small and close to the eye.
- Tiny ears: cat ears should be clearly pointed and sit on top of the head.
- Forgetting the tail: a cat without a tail looks unfinished — add a curling U-shape.
- Legs too long: long legs turn your sitting cat into a standing dog. Keep paws short and stubby.
- Pressing too hard on guides: sketch guide shapes lightly so they are easy to fix later.
- Eye too small: a tiny eye makes it look mean; a big round eye with a sparkle looks cute.
How to Color Your Cat
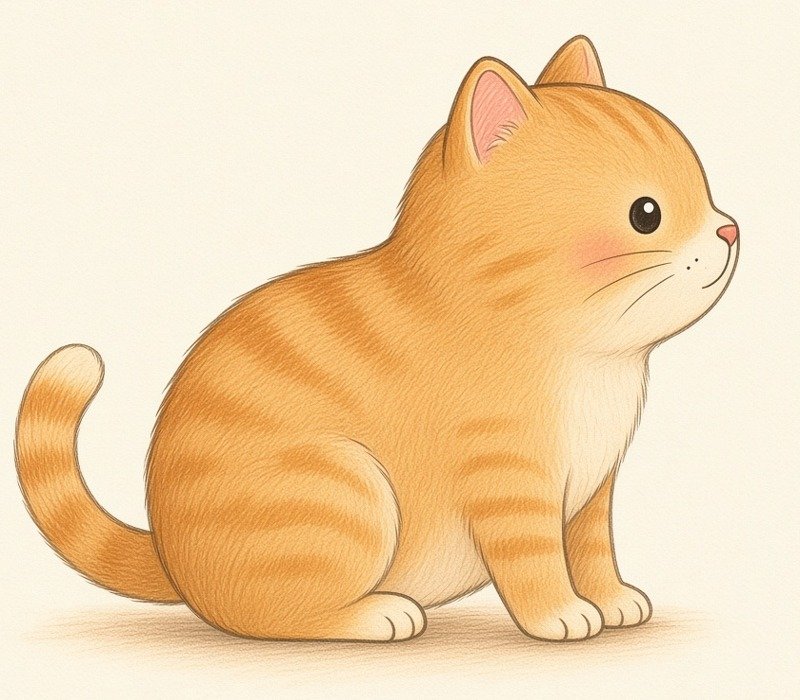
Warm ginger tabby
Lay down a light peach or soft orange base over the whole body. Build a second layer of richer orange on the back, haunch and tail. Add soft tabby stripes on the forehead, back and tail with a darker orange or light brown. Leave the chest, muzzle and paws creamier. Color the nose and inner ears pink, keep the eye black with a white sparkle, and finish with a soft ground shadow.
Kawaii or cartoon colors
For a cute sticker look, use one flat warm orange with a soft pink blush circle on the cheek and a cream patch on the chest. Bold black outlines, a big shiny eye and a tiny accessory — a bow, a flower or a little yarn ball — make it instantly kawaii. Want more ideas? Our kitten yarn basket coloring page and capybara orange picnic coloring page show fun scenes you can copy.
How to Draw a Cute Chibi Cat
Once you know the realistic-cute version, the chibi version is easy because you simply exaggerate the same shapes:
- Make the head almost as big as the body — two overlapping circles instead of an oval and a smaller circle.
- Keep the ears big and pointed.
- Make the eye a huge round dot with a white sparkle.
- Shrink the legs to four little bumps under the body.
- Add rosy cheeks, a tiny smile and a classic cat accessory: a yarn ball, a fish or a little bow.
Chibi cats are perfect for stickers, birthday cards and doodles. If you love drawing animals, try our sister tutorial next: how to draw a capybara in the same soft pencil style.
Practice Ideas
- Draw a sleeping cat: flatten the body oval, close the eye into a curved line and curl the tail around the body.
- Draw a kitten with yarn: copy the pose from our kitten coloring page.
- Draw it standing: stretch the body oval taller and lengthen the legs a little.
- Try a front view: the head becomes a circle with two big eyes and a small triangle nose.
Frequently Asked Questions
Is a cat easy to draw?
Yes. A sitting cat is one of the easiest animals for beginners because it is built from an oval, a circle, two triangle ears and a curling tail. Most people can draw a good one in 15–20 minutes, including coloring, by following the steps above.
What shapes do you use to draw a cat?
Use a large horizontal oval for the body and a circle for the head overlapping its front end. Then add pointed triangle ears, a small muzzle and a curling tail.
What color should I make my cat?
Anything you like! Ginger tabby (orange with stripes), grey, black, calico or pure white all work. Start with a light base coat, then build richer layers.
How do I make my cat drawing look cute?
Make the head bigger, the eye rounder and shinier, the legs shorter, and add blush plus a small accessory such as a yarn ball.
Can kids follow this tutorial?
Absolutely. Each step adds only a few lines, which makes it clear for children around age 6 and up. Younger kids may enjoy our free printables and coloring pages first.
What animal should I draw next?
Try our how to draw a capybara tutorial — it uses the same soft pencil style — or read more fun animal facts in our capybara facts guide.
Keep Creating
Now that you know how to draw a cat, print a few of our free coloring pages to practice coloring, explore why the internet loves chill animals, or download a cute animal wallpaper for inspiration. Happy drawing!